 Save
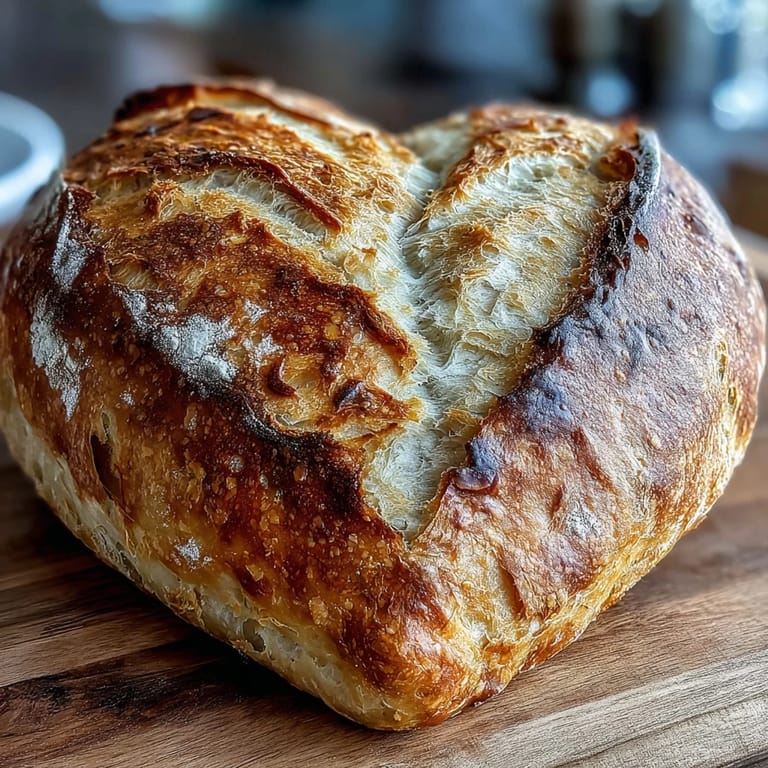
Save There's something quietly magical about shaping dough into hearts, watching the oven's heat transform them into golden symbols of care. My kitchen filled with the warm, tangy aroma of sourdough on Valentine's morning, and I realized this bread wasn't just about impressing someone—it was about slowing down, respecting the fermentation process, and creating something beautiful with my own hands. The crisp exterior and tender crumb inside felt like a love letter written in flour and salt.
I made these the morning my partner opened the kitchen door and caught me mid-score, rice flour dusting my apron and concentration written across my face. They laughed, stole a piece of the cooling bread an hour later, and said nothing needed decoration—the aroma was already perfect. That quiet moment reminded me why sourdough baking matters; it's not theater, it's presence.
Ingredients
- Active sourdough starter (100 g): Fed and bubbly means it's at peak fermentation power, ready to leaven your dough with natural yeast and bacteria that develop flavor over hours.
- Bread flour (350 g): The protein structure here gives you that chewy, open crumb that makes sourdough sing.
- Whole wheat flour (50 g): Adds nutty depth and complexity without overwhelming the delicate tang of fermentation.
- Water (280 g, room temperature): Hydration is your secret weapon for an airy crumb; warm water helps the starter work efficiently.
- Fine sea salt (8 g): Add it after the autolyse rest, never directly on starter, because salt kills yeast temporarily and you want activation, not shutdown.
- Rice flour for dusting: Unlike regular flour, it doesn't hydrate and stick; it brushes away cleanly, revealing your scored artwork underneath.
- Optional edible flowers or seeds: These transform cooling bread into art, but only add them after the loaf has cooled completely so they don't scorch or absorb steam.
Tired of Takeout? 🥡
Get 10 meals you can make faster than delivery arrives. Seriously.
One email. No spam. Unsubscribe anytime.
Instructions
- Mix and rest the dough:
- Combine starter, flours, and water in a large bowl, stirring until there are no dry flour pockets. This 30–45 minute autolyse rest lets the flour fully hydrate and begin breaking down, making the next steps easier and the final crumb more open.
- Incorporate the salt:
- After autolyse, add salt and mix thoroughly by hand or with a wet hand technique, squeezing the dough repeatedly until salt is fully distributed. You'll feel the dough tighten and strengthen as you work.
- Perform stretch-and-folds:
- Wet your hand, grab the dough's edge, stretch it up and fold it over the center, rotate the bowl, repeat from all four sides. Do this every 30 minutes for 3–4 rounds; you'll watch the dough transform from shaggy to smooth and cohesive without traditional kneading.
- Let it bulk ferment:
- Shape dough into a loose ball, cover with a damp towel, and let it rest at room temperature for 4–6 hours until roughly doubled. You're looking for visible bubbles on the surface and a slight dome; poke it gently—the indentation should slowly spring back halfway.
- Shape into hearts:
- Turn dough onto a lightly floured surface and divide in half. Take each piece, flatten it gently, pinch the base to create a point, and use your thumb to indent the top center where a heart dips inward. Handle with care because this dough is alive with gas; you want to preserve those bubbles.
- Cold proof overnight:
- Place each heart into a floured proofing basket or bowl lined with a towel, cover loosely, and refrigerate for 8–12 hours. The cold slows yeast activity while bacteria keep working, developing sour flavor and making scoring easier because cold dough holds its shape better.
- Preheat and score:
- Heat your oven to 240°C (465°F) with a Dutch oven or baking stone inside for at least 30 minutes so it's screaming hot. Remove dough from the fridge, invert onto parchment paper, dust generously with rice flour, and use a sharp blade to score artistic heart patterns or simple lines into the surface, holding the blade at a 30-degree angle for deep ear formation.
- Bake with steam then dry:
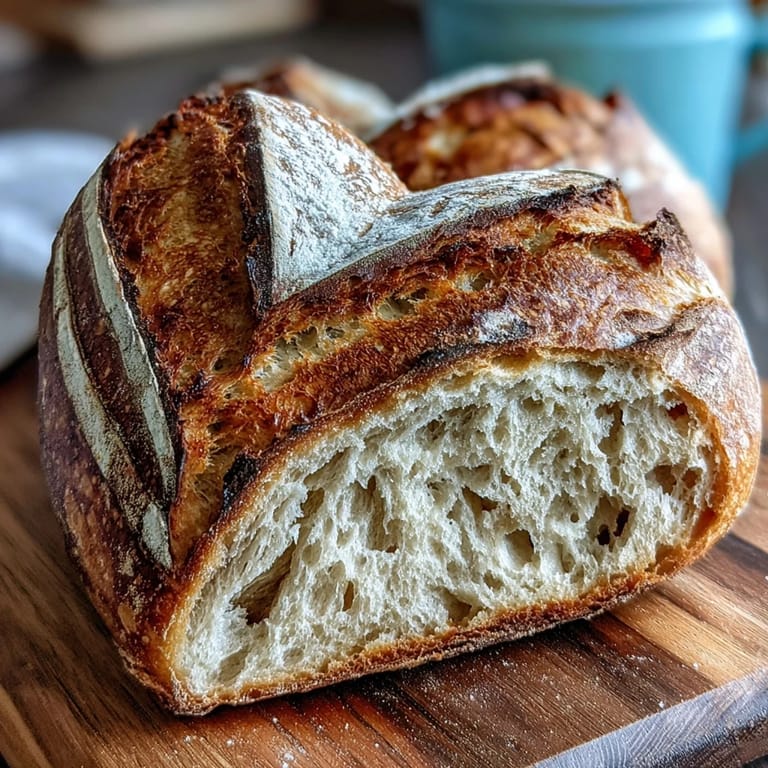
- Transfer parchment and dough into the hot Dutch oven, cover with the lid, and bake for 20 minutes to trap steam and allow the heart to expand. Uncover, reduce to 220°C (425°F), and bake another 15 minutes until the crust is deep golden and sounds hollow when tapped underneath.
- Cool completely:
- Transfer to a wire rack and let rest for at least an hour; the crumb continues setting and the crust develops its final crispness as it cools. Only then can you add optional flowers or seeds, transforming warm bread into a finished masterpiece.
 Save
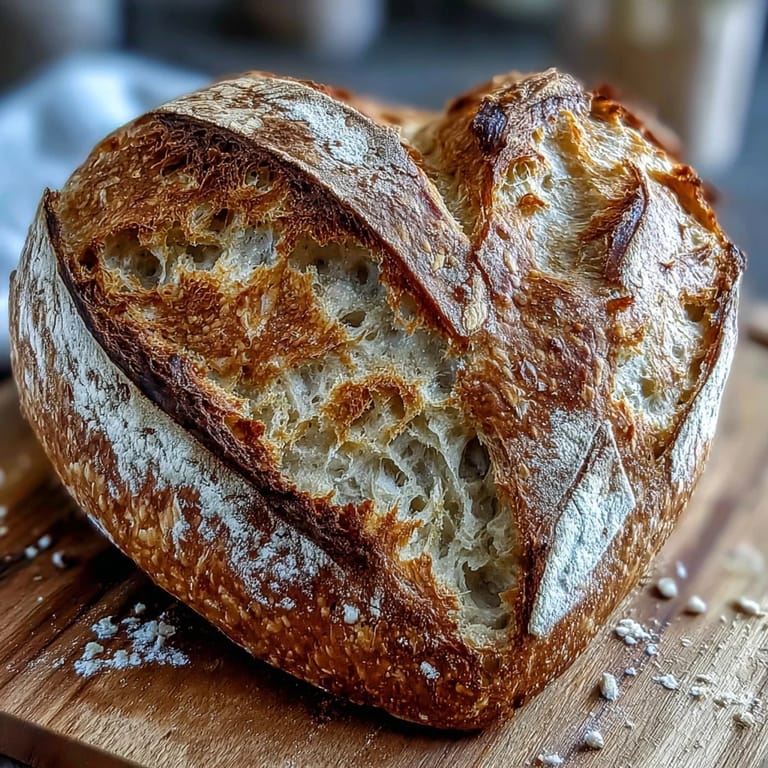
Save The moment the Dutch oven lid came off and steam rushed out, revealing those delicate scored hearts blushed with golden color, I understood why people become obsessed with sourdough. It wasn't just bread; it was proof that time, patience, and respect for fermentation create something you simply cannot rush or fake. My partner brought flowers to the kitchen table that evening, and we tore into those loaves still warm, letting the butter melt into the warm crumb.
Why Cold Proofing Matters More Than You Think
Most home bakers skip the overnight rest and wonder why their crumb stays tight and their flavor stays bland. Cold proofing sounds like an inconvenience, but it's actually where magic happens—yeast slows down while lactic acid bacteria keep fermenting, developing sourness, depth, and digestibility that fast room-temperature ferments simply cannot achieve. I learned this the hard way, rushing a batch on a weeknight and tasting the flat difference immediately.
Scoring as an Art Form
Scoring isn't decoration; it's a structural decision that controls where your bread expands. A deep, confident cut guides steam and heat into the crumb, creating that gorgeous ear and allowing the loaf to grow dramatically in the oven. My first attempts were timid scratches, but once I held the blade at a 30-degree angle and committed to clean, deliberate strokes, the loaves came out with sculptural definition that made the heart shape even more striking.
Personalizing Your Bread
The beauty of this recipe is that it's a foundation for your creativity, not a strict rulebook. Some days the dough wants extra folds, some days it moves slower, and listening to those changes makes you a better baker than following exact timers ever could. I've experimented with beetroot powder for a pink swirl, added seeds to the scoring cuts, even shaped one heart larger than the other to feel more organic.
- For a subtle pink hue, knead 1 tablespoon of beetroot powder into half the dough before shaping and keep it in a separate proofing basket for a swirled effect.
- Serve these hearts alongside flavored butters infused with herbs, honey, or citrus zest to amplify the bread's complex sourness.
- Store cooled loaves in a paper bag at room temperature for up to three days; re-crisping the crust takes just 5 minutes in a 200°C oven before serving.
 Save
Save Baking sourdough hearts transforms an ordinary day into something you anticipate and remember. Whether it's for Valentine's Day, a special someone, or simply a gift to yourself, these loaves remind you that beautiful things take time, presence, and a little bit of patience.
Common Recipe Questions
- → How do I shape the dough into hearts?
After the dough rises, flatten each portion slightly, pinch the base to form a point, and create an indentation at the top center to resemble a heart shape.
- → What is the purpose of the cold proofing step?
Cold proofing overnight slows fermentation, enhancing the flavor and improving the dough's structure for a better crust and crumb.
- → How should I score the dough for the pattern?
Dust the dough generously with rice flour, then use a sharp blade to carefully cut artistic heart-shaped patterns before baking.
- → Can I add color to the dough?
Yes, kneading beetroot powder into half the dough before shaping adds a subtle pink swirl for a festive look.
- → What baking method ensures a crisp crust?
Baking first covered in a Dutch oven and then uncovered creates steam that crisps the crust while keeping the crumb moist and airy.