 Save
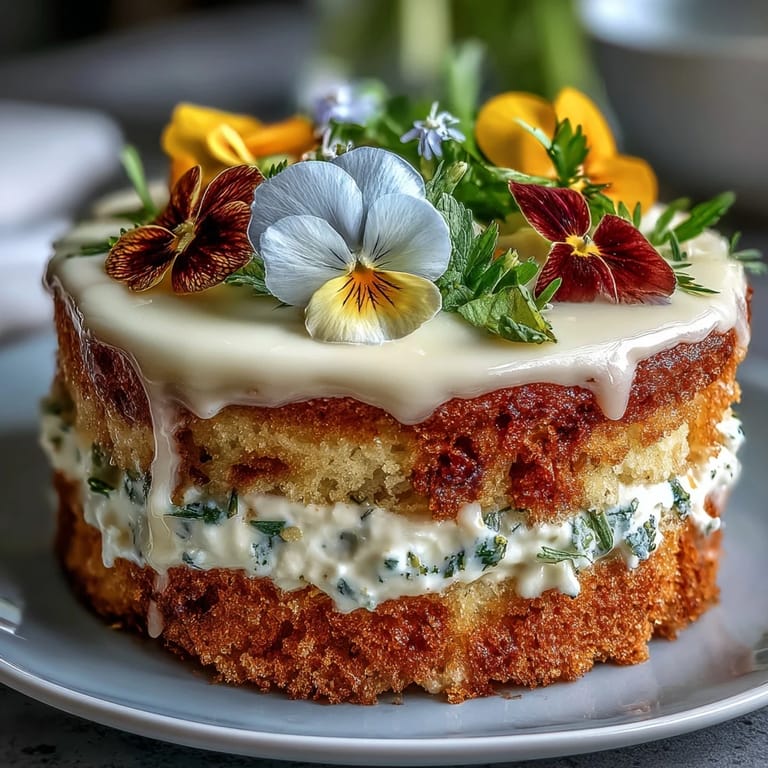
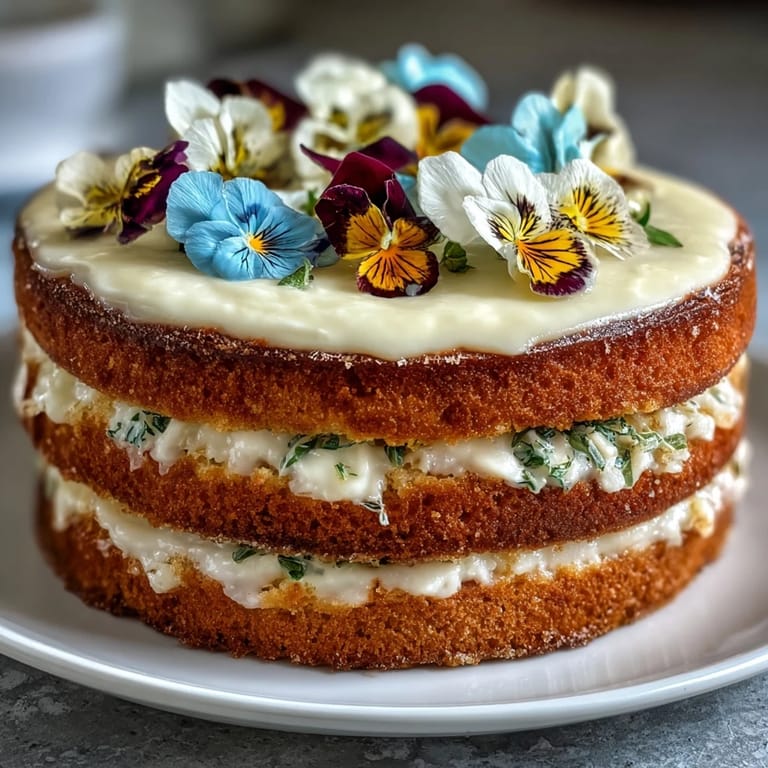
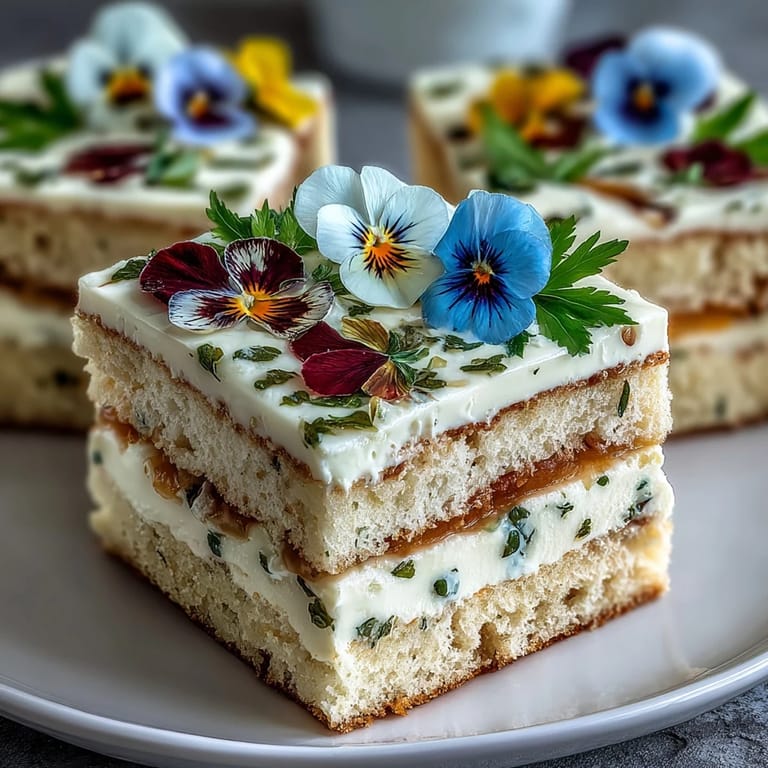
Save An early spring afternoon when sunlight filtered through my kitchen window was the first time I attempted this pressed flower cake. The aroma of lemon zest and butter mingled in the air, and my curiosity about edible flowers had me grinning as I placed pansies and violets onto the counter. I remember being nervous about whether the flowers would hold their vibrant colors after pressing, but their transformation was surprisingly beautiful. Each step felt like a mini celebration as I watched the cake come together. There's something rather magical about cooking with blossoms that just can't help but brighten your mood.
One day, I made this cake for a friend’s birthday picnic in the park—we carefully carried it on a vintage cake stand, and every person who passed by stopped to admire the edible flower decorations. It was a moment of light-hearted laughter, as someone asked if the flowers were real or made of sugar. The gentle sun, crisp breeze, and the sight of the cake surrounded by grass made me feel like we’d set up a dessert table straight out of a storybook. Even the bees seemed interested, but thankfully, we kept them at bay! That memory still makes me smile every time I press flowers onto a cake.
Ingredients
- Unsalted butter: Room temperature butter makes for a smoother, lighter sponge—don’t rush this step or the cake’s texture will suffer.
- Granulated sugar: Creaming sugar fully with butter ensures tiny air bubbles and a soft crumb; scraping the bowl mid-way is a lifesaver I learned after a few dense attempts.
- Eggs: Room temperature eggs blend more easily, so I let them sit out as I prep everything else.
- Vanilla extract: A dash brings out the floral notes—use real extract for best results.
- All-purpose flour: Sifting prevents surprises; lumps can lurk when you least expect it, so I never skip this step anymore.
- Baking powder: It gives the sponge its springy lightness, and measuring with care prevents accidental bitterness.
- Fine sea salt: Just a pinch unlocks sweetness and highlights the lemon.
- Whole milk: Room temperature milk keeps the batter from curdling and helps it mix smoothly.
- Lemon zest: Fresh zest carries spring into every bite—scrub lemons well and grate only the bright yellow part.
- Freshly squeezed lemon juice: The zing from real lemons is a game changer in lemon curd compared to bottled juice.
- Lemon curd eggs: Whisking constantly over gentle heat is key—this is how you avoid scrambled curd.
- Powdered sugar: Whipped cream likes a touch of sweetness without graininess, so sift before using.
- Heavy cream: Chilled cream whips faster and stays light; don’t over whip or it turns buttery.
- Pressed edible flowers: The stars of the show—choose organic, safe varieties and press gently between parchment days before decorating.
Tired of Takeout? 🥡
Get 10 meals you can make faster than delivery arrives. Seriously.
One email. No spam. Unsubscribe anytime.
Instructions
- Prep the pans:
- Grease and line your cake pans with parchment, letting the edges peek out for easy removal later. It never hurts to double-check you’re using parchment, not wax paper—I made that mistake once and it was a mess!
- Cream butter and sugar:
- Beat butter and sugar until pale and fluffy, listening to the whir of your mixer and pausing to scrape the bowl so every bit is combined. The aroma at this stage is always inviting and signals you’re on track.
- Mix eggs and flavorings:
- Add eggs one at a time, watching the batter become glossier, then stir in vanilla and lemon zest. Enjoy the bright scent as you fold them in—it’s the first real taste of spring.
- Add dry ingredients and milk:
- Alternate adding flour, baking powder, salt and milk, blending gently until just combined. Avoid over-mixing; stay patient as the batter transforms into a silky cream.
- Bake and cool:
- Divide the batter evenly and bake until golden and a toothpick comes out clean. Let them sit for 10 minutes before turning onto wire racks, where they cool as you prepare the lemon curd.
- Make the lemon curd:
- Whisk eggs, sugar, lemon juice, and zest in a bowl atop simmering water, stirring constantly until thickened. Remove, then melt in butter a bit at a time, stirring until glossy, and let cool completely.
- Whip the cream:
- With everything chilled, whip the cream, powdered sugar, and vanilla to stiff peaks—look for velvety folds that hold their shape.
- Layer and assemble:
- Set the first cake layer down, spread liberally with lemon curd, then add the second layer. Coat the top and sides lightly with whipped cream, smoothing with an offset spatula.
- Decorate with flowers:
- Arrange your pressed flowers gently on the surface, spacing them in patterns or scattering freestyle. Press softly so they adhere but don’t lose their shape.
- Chill and serve:
- Chill the finished cake at least thirty minutes so the decorations set. Slice carefully and enjoy each piece!
 Save
Save After sharing this cake at a spring garden party, I realized it was more than a dessert—it became a centerpiece and conversation starter. People snapped pictures, asked how I pressed the flowers, and some even swiped extra lemon curd for their slice.
Pressing Edible Flowers: The Simple Technique
The trick to keeping flowers vibrant is to press them between parchment with a heavy book several days ahead, so they dry without losing color. I like to use different flower shapes and colors, and sometimes mix petals for a painterly look. The process is oddly calming, and I always find myself admiring the patterns before placing them on the cake. Make sure to check the flowers for bugs and dirt before pressing—those tiny surprises can ruin the effect. There’s something extra special about knowing you grew or sourced the blooms yourself.
Lemon Curd Mastery: Making It Silky and Tangy
Lemon curd can go lumpy if rushed, so I stir slowly and constantly while watching the steam rise from the saucepan. Adding butter after thickening gives that glossy finish—sometimes I sneak a spoonful to taste the tang! When cooled, it’s easy to spread, and homemade curd feels way richer than store-bought. I always zest a little extra lemon for a stronger fragrance. If you ever overcook it, pressing through a fine sieve fixes everything.
Cake Assembly: Patterns, Layers, and Chilling Tricks
The layer process can feel intimidating, but I swear the whipped cream acts like a forgiving shield for any rough edges. Pressing flowers on is my favorite part because I can play with design, and even little mistakes get masked by their beauty. Chilling the cake ensures everything holds together and the flavors meld. Using an offset spatula keeps the cream smooth and puffy. Don’t rush the chilling—your patience is rewarded in each slice.
- Keep extra pressed flowers aside in case any break during decorating.
- If the cake domes, trim before assembling for neat layers.
- Always serve chilled for best flavor and appearance.
 Save
Save If you make this cake, I hope you find as much joy in decorating as in sharing it with friends. It brings a little bit of spring to your table, no matter the weather outside.
Common Recipe Questions
- → How do I prepare pressed edible flowers for decoration?
Choose organically grown flowers free from pesticides. Press them gently between parchment and heavy books for several hours until flat and dry.
- → Can I make any elements ahead of time?
Sponge layers may be baked a day ahead and stored at room temperature, wrapped tightly. Lemon curd can be prepared in advance and refrigerated.
- → What flowers work best for this cake?
Pansies, violets, nasturtiums, and rose petals are excellent options. Always confirm they are safe and edible.
- → How can I intensify the lemon flavor?
Brush the cake layers lightly with lemon syrup before adding curd for extra zesty depth.
- → What tools are essential for assembly?
An electric mixer ensures fluffy textures, while an offset spatula helps with smooth frosting. Use a double boiler for curd-making.
- → What beverages pair well with this cake?
Earl Grey tea or sparkling Moscato complement the floral and citrus notes beautifully.