 Save
Save I discovered rice paper egg pouches by accident one morning when I had leftover rice paper and a craving for something crispy. My roommate was making fried eggs, and I thought: what if we wrapped that in something golden and delicate? The result was this unexpectedly satisfying snack that comes together in minutes and tastes far more impressive than its simplicity suggests.
Last week I made these for a friend who showed up hungry and skeptical about the whole concept. The moment she bit through that crackling exterior and the warm cheese spilled out, her expression changed completely. She asked for the recipe before she even finished eating, which felt like the highest compliment.
Ingredients
- Rice paper wrappers: The delicate rice paper is your vehicle for crispiness—don't use the thickest ones, as they won't crisp quite as beautifully.
- Eggs: Large eggs give you enough filling to make the pouch satisfying without tearing the wrapper.
- Cheese: Cheddar and mozzarella melt most reliably, but I've used whatever was in my fridge and it worked.
- Scallions: They add a sharp freshness that keeps the whole thing from feeling too heavy or one-note.
- Vegetable oil: Use neutral oil so the egg and cheese flavors stay front and center.
- Salt and pepper: Don't skip seasoning the egg itself—it makes a noticeable difference.
Tired of Takeout? 🥡
Get 10 meals you can make faster than delivery arrives. Seriously.
One email. No spam. Unsubscribe anytime.
Instructions
- Soften your rice paper:
- Dip one wrapper into warm water for just 10 to 15 seconds—it should feel supple but not falling apart. Place it on a damp towel or board; it will continue to soften as you work.
- Whisk and season:
- Beat one egg in a small bowl with a tiny pinch of salt and pepper. This is where the egg gets its flavor, so don't be timid.
- Heat the pan:
- Warm half a tablespoon of oil in a nonstick skillet over medium heat. You want it shimmering but not smoking.
- Build the filling:
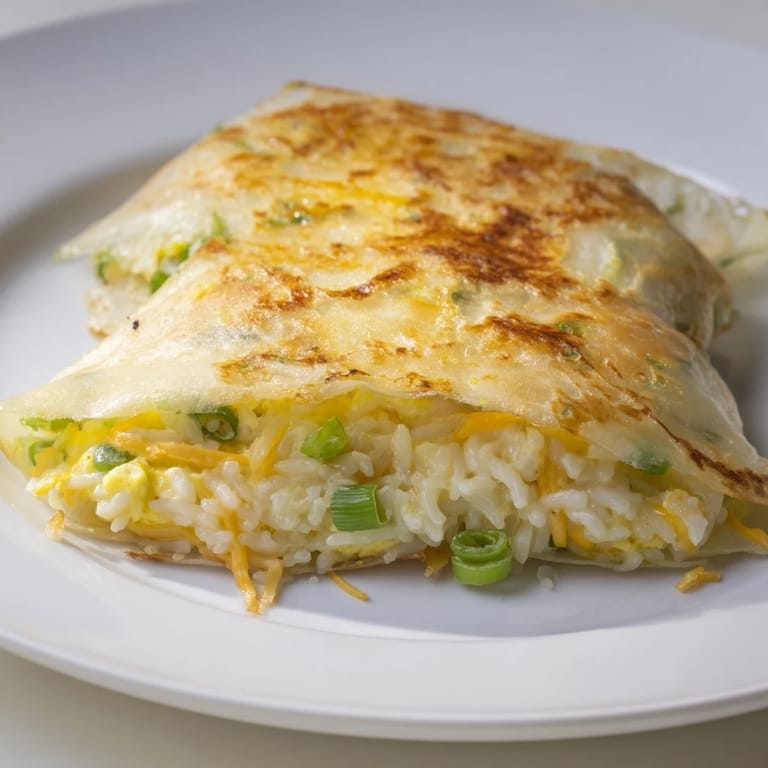
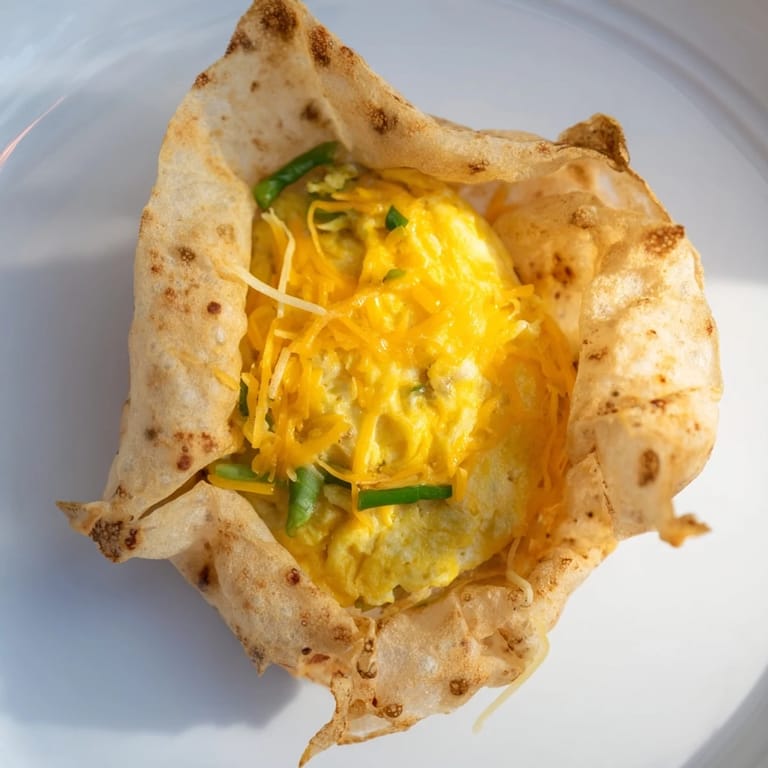
- Pour the beaten egg into the center of the softened rice paper, then scatter half your scallions and half your cheese right over it. The heat will melt everything together.
- Fold into a pouch:
- Fold all four sides of the rice paper over the filling to create a square or rectangular parcel. It doesn't need to be perfect—rustic looks good here.
- First side down:
- Carefully transfer the pouch seam-side down into the skillet. Let it cook untouched for 2 to 3 minutes until the bottom turns golden and crispy.
- Flip and finish:
- Use a spatula to flip it gently, then cook the other side for about 2 minutes until it's equally golden. You'll hear a satisfying sizzle.
- Second pouch:
- Repeat the entire process with your second rice paper and remaining filling.
- Serve while hot:
- Plate them immediately, optionally drizzle with sriracha or scatter chili flakes on top if you like heat.
 Save
Save There's something almost magical about the moment you hear that first crackle as the pouches hit the hot oil. It's the sound of something delicate becoming crispy, and it always makes me feel like I'm doing something right in the kitchen.
The Wrapper Matters
Not all rice paper is created equal. Thinner wrappers become impossibly crispy and shatter in a satisfying way, while thicker ones stay chewy and pale no matter how long you cook them. I learned this the hard way after my first batch looked more steamed than fried. The thin ones brown beautifully and hold their shape, turning this simple egg into something that looks restaurant-worthy.
Playing With Fillings
The egg and cheese foundation is just your starting point. I've added diced ham one morning and had coworkers asking what I'd made. Mushrooms work beautifully sautéed first so they're not watery. Spinach needs a squeeze to remove excess moisture. Cilantro and jalapeños make it feel completely different but equally delicious. The wrapper stays the same, but the filling tells different stories depending on what's in your kitchen.
Timing and Temperature
Medium heat is genuinely the sweet spot—too high and the outside chars before the egg sets, too low and you end up with a soft wrapper instead of a crispy one. The whole cooking process from wrapper to plate takes about 8 minutes, which is why this becomes my go-to when I'm hungry right now, not in 20 minutes. These are best eaten immediately while the contrast between crispy exterior and warm filling is at its peak.
- Make sure your skillet is fully heated before the pouch touches it, or the bottom won't crisp properly.
- If you're serving two people, you can make them back-to-back without letting the pan cool down.
- Let them cool for just 30 seconds before biting in—the cheese inside is genuinely molten.
 Save
Save This recipe proved to me that some of the most satisfying meals don't need elaborate techniques or long ingredient lists. Just a few good ingredients, a little warmth, and a moment of attention—and you've made something that tastes thoughtfully made.
Common Recipe Questions
- → How do I soften the rice paper without tearing it?
Dip the rice paper into warm water for 10–15 seconds until just pliable. Avoid soaking too long to prevent tearing.
- → Can I use different cheeses in this dish?
Yes, cheddar, mozzarella, or any shredded cheese of your choice works well and melts nicely inside the pouch.
- → What is the best way to cook the rice paper fold evenly?
Cook seam-side down in a preheated nonstick skillet over medium heat for 2–3 minutes until golden, then flip and cook another 2 minutes.
- → Are there any good add-ins to enhance flavor?
Try adding diced ham, mushrooms, or spinach for extra texture and taste variations.
- → Can this be made gluten-free?
Yes, use certified gluten-free rice paper wrappers to ensure the dish remains gluten-free.